
Connect your Shopify store: the ExceliaBOT app
Install the ExceliaBOT app from the Shopify App Store and link it to your account: every order step reaches your customer on WhatsApp, left checkouts get a reminder with their own link, and the assistant knows your products — with the plan chosen and billed inside Shopify.
#What the app does
The app connects your Shopify store to ExceliaBOT without any webhook to paste. Once it is linked, your store tells us about every order and every change of its status, and we send the customer the message you chose for that step — received, paid, out for delivery, delivered, cancelled or refunded — with their name and order details filled in.
- Order messages at each step, from templates Meta approved — set up on the Store orders page like any other store.
- Confirm or cancel from WhatsApp: a template with quick-reply buttons lets the customer confirm the order or ask to cancel it, and the order in Shopify is tagged or cancelled accordingly.
- Left checkouts: a customer who started a checkout and left gets a reminder with their own checkout link, from an audience or a follow-up flow.
- Products for the assistant: the assistant reads your active products, recommends them and sends a card with the picture, price and link.
- Plans and billing on Shopify: you choose the plan on Shopify’s plan page and Shopify bills your store; nothing is paid anywhere else.
#Installing and linking
- Install ExceliaBOT on your store from the Shopify App Store. Shopify shows the permissions the app asks for — orders, customers, fulfilments and products — and you approve them.
- The app opens inside your Shopify admin and says “One last step — link your ExceliaBOT account”. Press Sign in and link the account.
- Sign in with the owner’s email and password — or, if you have no account yet, press Create a free account: a one-minute form, then confirm your email from the link we send.
- A dialog names the store and the account it will be linked to. Press Connect the store.
- You are taken to Shopify’s plan page. Pick Free to start, or a paid plan — Shopify asks you to approve the charge and bills your store. Shopify then brings you back to ExceliaBOT.
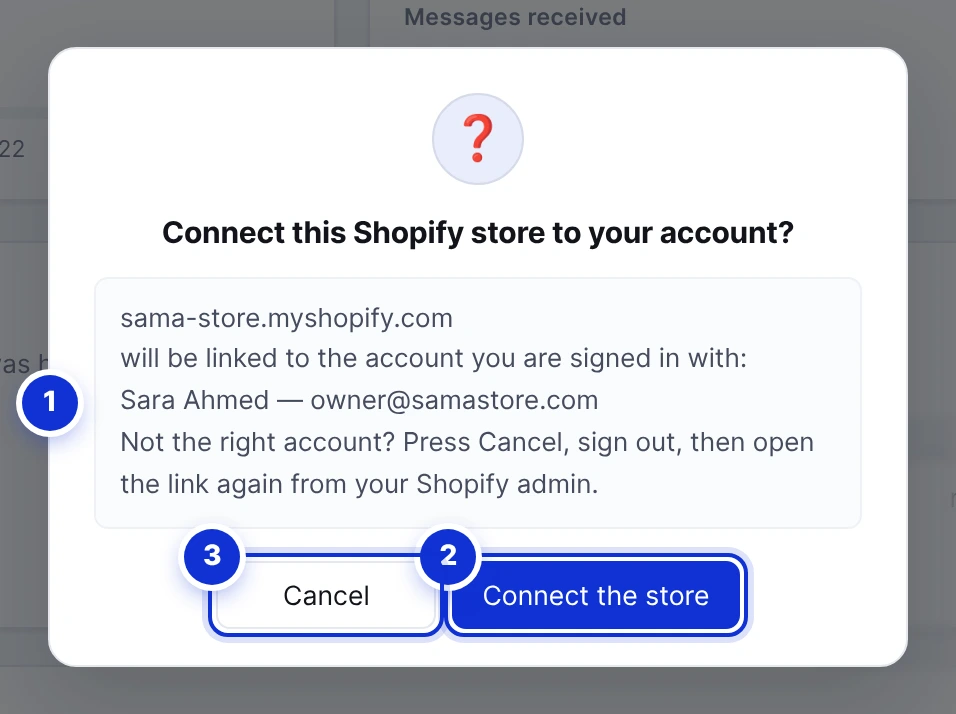
- 1The store and the account it will be linked to.
- 2Connect the store.
- 3Cancel — for another account, sign out and open the link again from your Shopify admin.
One store per account. An account that already has a store linked cannot take a second one, and a store linked to another account is refused. Disconnect first from Store orders → Setup.
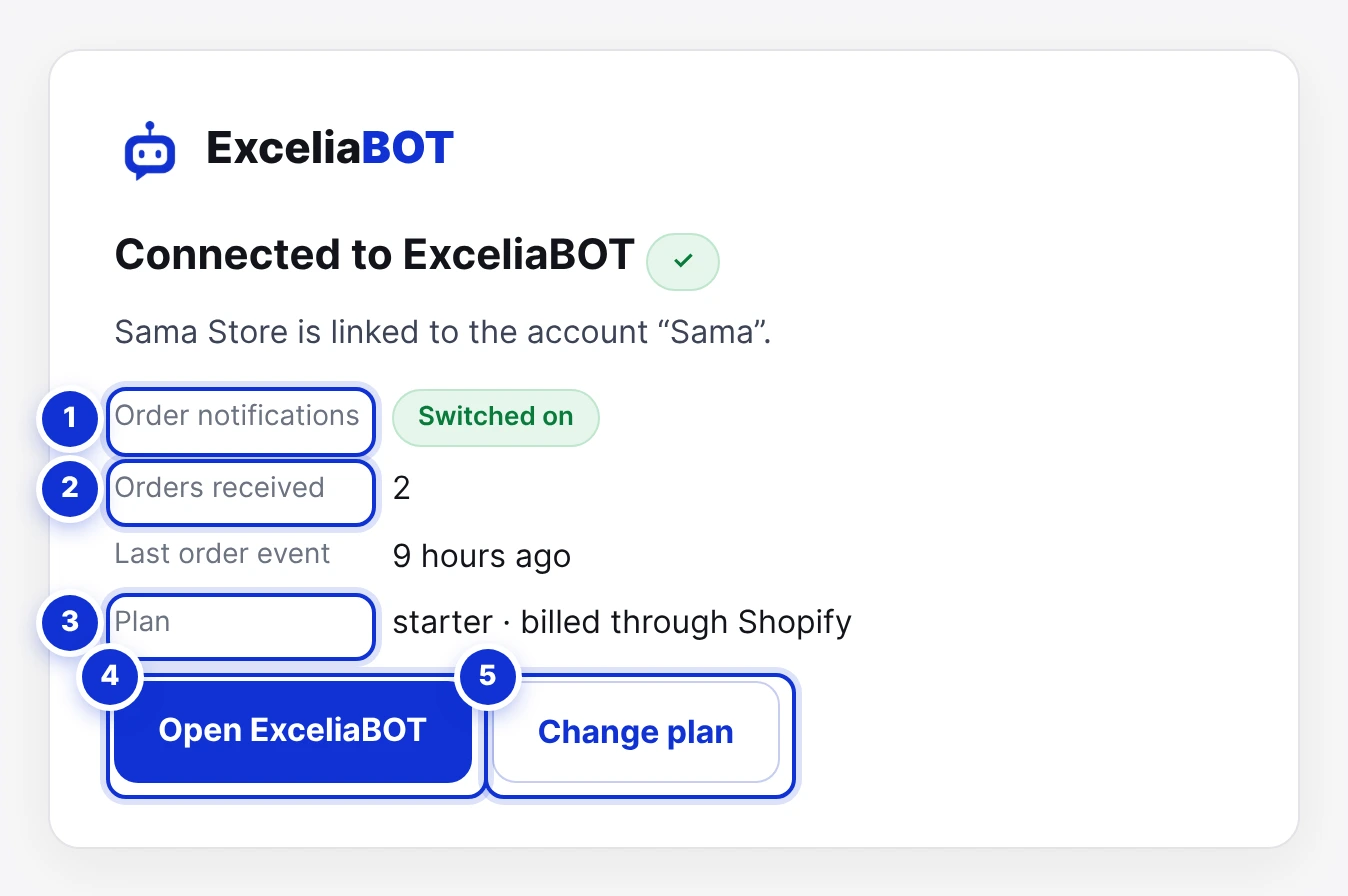
- 1Order notifications — the store’s events reach us.
- 2Orders received since the link, and the last order event.
- 3The plan, as chosen on Shopify.
- 4Open ExceliaBOT — straight to the dashboard.
- 5Change plan — Shopify’s plan page.
#What you see in ExceliaBOT
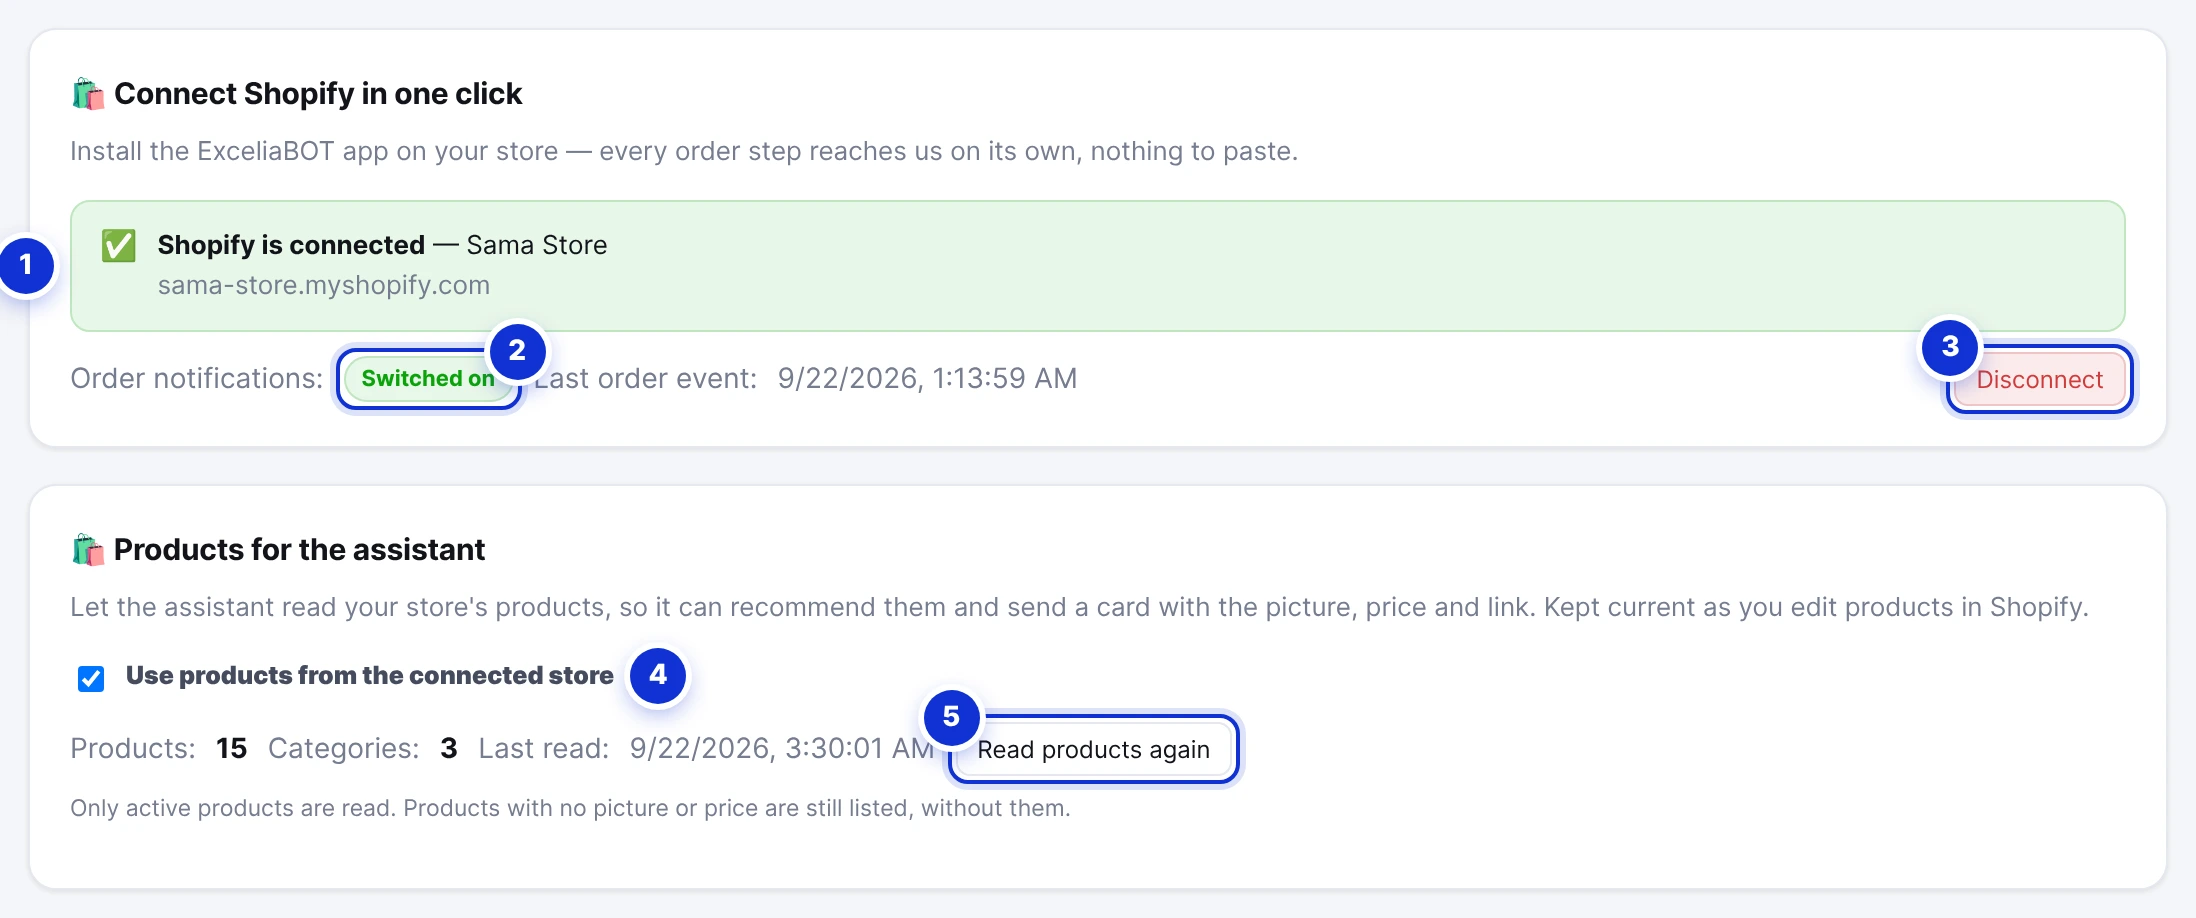
- 1Shopify is connected — the store and its address.
- 2Order notifications switched on.
- 3Disconnect — the app is removed from the store and the store forgets the account.
- 4Use products from the connected store — the assistant’s catalogue.
- 5Read products again — a refresh; products are also re-read every night and updated as you edit them in Shopify.
From here everything works as on the Store orders page: choose a template for each step under Order messages, follow every event under History, and build lists of customers who left a checkout or placed an order under Audiences.
Order messages and the buttons
Shopify reports the steps *received*, *paid*, *out for delivery*, *delivered*, *cancelled* and *refunded*; each is a card on the Order messages tab. If the template you attach to a step has quick-reply buttons, the card lets you say what each button does — confirm or cancel. When the customer taps one, the order in Shopify is tagged *whatsapp-confirmed*, or cancelled if it is unpaid; a paid order gets the tag *whatsapp-cancel-requested* unless you switched on cancelling paid orders on the Setup tab.
Left checkouts
A checkout the customer started and left is recorded with their phone number, the items and their own checkout link. Under Audiences the rule *Left a checkout without buying* builds a list you can send a campaign to — use the template button type Checkout link, and each customer receives their own link. Under Follow-ups, a flow whose entry is *Customers who left a checkout in your store* sends the reminder by itself and stops the moment they buy or reply.
Products for the assistant
Tick Use products from the connected store on the Setup tab and the assistant reads your active products — name, price, picture, link and category. It recommends what fits the customer’s question, sends a card with the picture and the link, and says when something is out of stock. A large catalogue is searched by the customer’s words, so the assistant looks only at the products that match.
#Your plan and billing
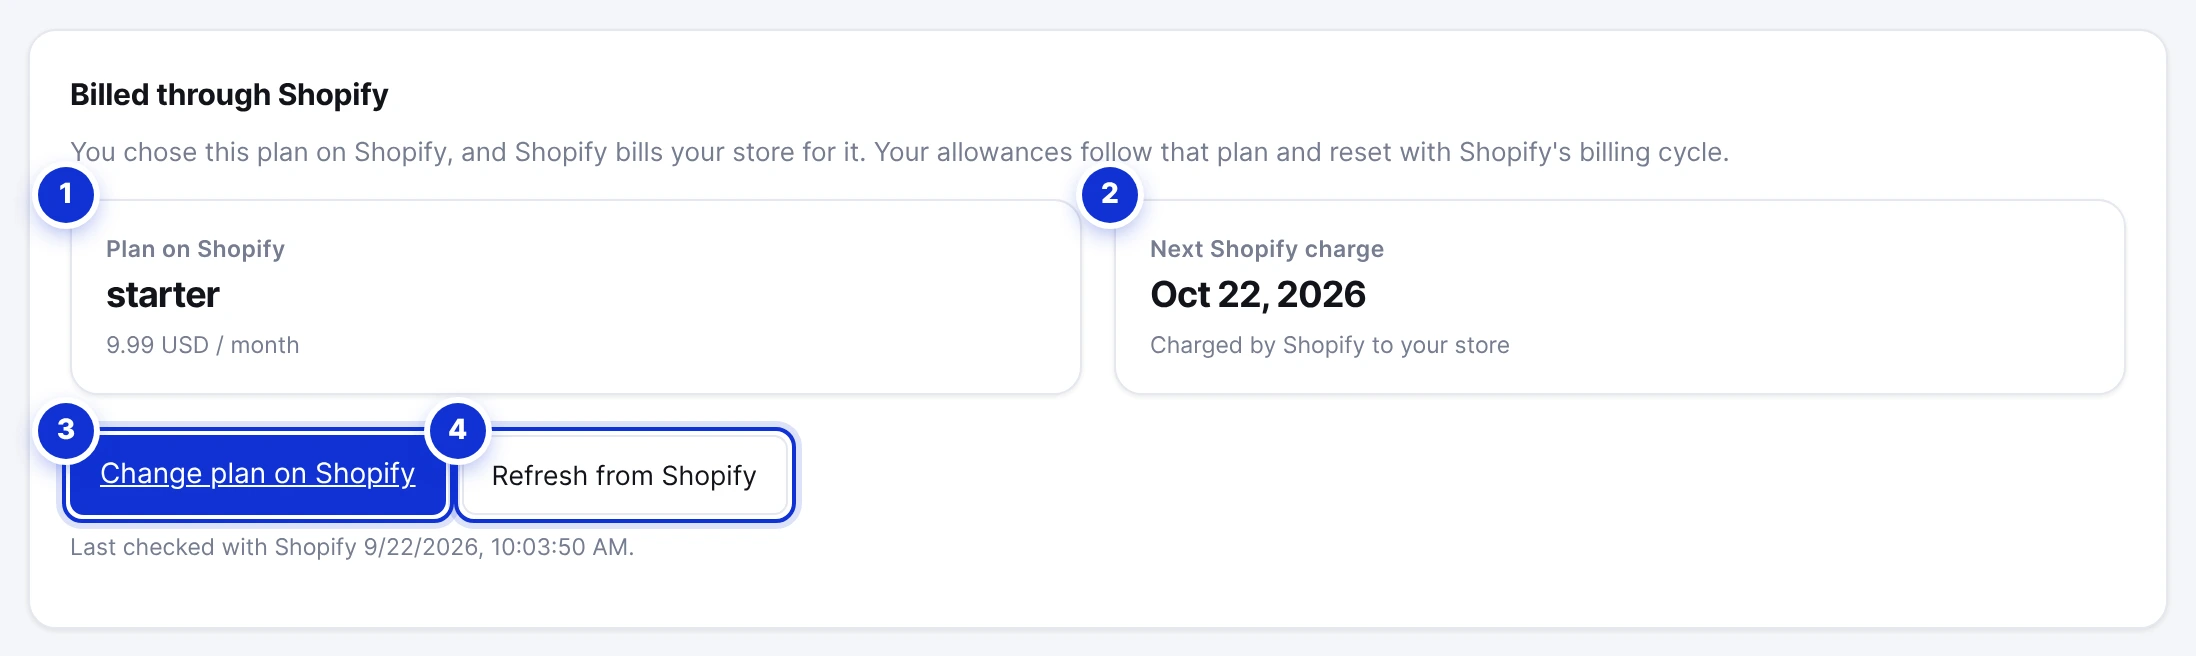
- 1The plan on Shopify and its price.
- 2The next Shopify charge, or the date the plan ends if you cancelled it.
- 3Change plan on Shopify — upgrades and downgrades happen there.
- 4Refresh from Shopify — read the subscription again now.
The plan is chosen on Shopify’s plan page and billed by Shopify to your store, in your Shopify invoice. Your allowances — AI replies, campaign messages, conversations, seats — follow that plan and reset with Shopify’s billing cycle. We read the subscription back from Shopify when you return from the plan page, every time the app opens in your admin, and once an hour.
| Plan on Shopify | What it includes |
|---|---|
| Free | 50 AI replies, 100 conversations and 250 campaign messages a month |
| Starter | 1,000 AI replies and 300 campaign messages a month, one seat |
| Growth | 10,000 AI replies and 500 campaign messages a month, five seats, priority support |
Uninstalling the app cancels the Shopify charge. Your plan runs to the end of the period you paid for, then the account moves to the Free plan. Reinstalling takes you through linking and the plan page again.
#What the app can see and do
- Read orders, customers, fulfilments and products — to send the messages and to know your catalogue.
- Write orders — only to tag an order, add a note, or cancel it when the customer asks from WhatsApp.
- Nothing is written to your theme or your storefront.
I installed the app but nothing shows in ExceliaBOT.
Do I still need the webhook on the Setup tab?
Can I link two stores to one account?
Where do I change my plan?
The customer confirmed, but the order was not cancelled.
Write to us and a real person answers — usually the same working day. [email protected]
Or message your account manager from the My Manager page in the dashboard.